side banner
side banner
United States
United States
Canada
Austria
Belgium
Bulgaria
Croatia
Cyprus
Czech Republic
Denmark
Estonia
Finland
France
Germany
Greece
Hungary
Ireland
Italy
Latvia
Lithuania
Luxembourg
Malta
Netherlands
Poland
Portugal
Romania
Slovakia
Slovenia
Spain
Sweden
Switzerland
United Kingdom
Japan
Singapore
Hong Kong
Taiwan
China
South Korea
Australia
New Zealand
secret coupon
Presidents Day Sale! — Get Up To 10% off On All Game Tables! GET COUPON
×

Welcome!

We noticed you're visiting from .... Update your location?

United States
United States
Canada
Austria
Belgium
Bulgaria
Croatia
Cyprus
Czech Republic
Denmark
Estonia
Finland
France
Germany
Greece
Hungary
Ireland
Italy
Latvia
Lithuania
Luxembourg
Malta
Netherlands
Poland
Portugal
Romania
Slovakia
Slovenia
Spain
Sweden
Switzerland
United Kingdom
Japan
Singapore
Hong Kong
Taiwan
China
South Korea
Australia
New Zealand

The Arena Display V1 to V2 Upgrade Instructions

HARDWARE UPGRADE INSTRUCTIONS
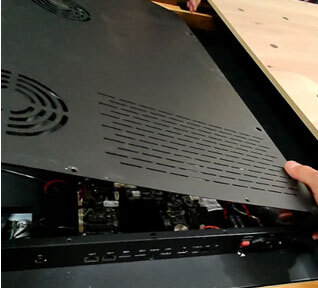
  1. Turn the Arena over.
  2. Remove the bolts and detach the bottom plate, remove the center plate only. The two side plates do not need to be fully removed.
  3. Remove the support beams supporting the center of the display.
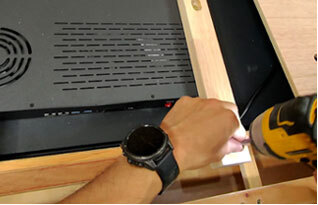
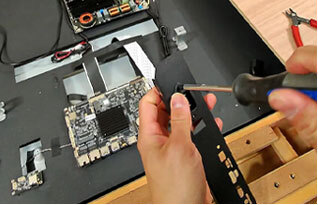
  1. Unscrew and remove the back plate of the display.
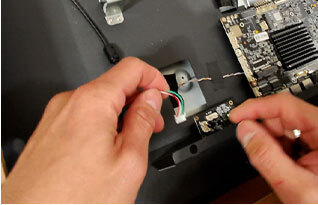
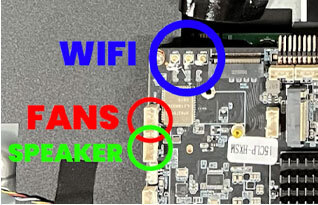
  2. Once the back plate is free, carefully remove the 3 Wifi Antenna pins, the speaker plug, and fan plug. Note: Silicone is used to reinforce the connections, you can use small plyers or wire cutters to remove excess silicone to make the plugs easier to remove. We will provide silicone to finalize your connections at the end of the upgrade.
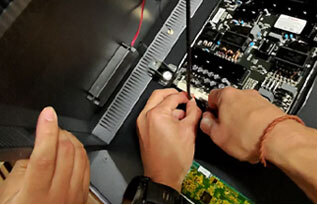
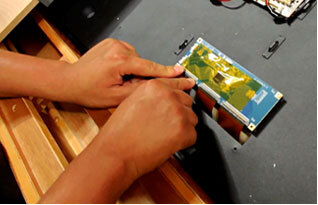
  1. Replace the Touch Panel Controller at the top of your display. The ribbon connection is disconnected by opening/releasing the black plastic clip, removing the ribbon and to reinstall simply re-insert the ribbon into the new Touch Panel Controller, ensuring that it’s straight and inserted all the way into the TPC board, there is a line on the ribbon to show how far it should go in.
  2. Remove the old wire from the the TPC to main board by cutting loose the zip ties and remove the wire completely.
  1. Replace with the new wire from the upgrade kit and connect to new TPC board. Do not zip tie it down yet, we will do this at the end.
  2. Now at the bottom of the display, remove the existing baffle (outlets) by unscrewing the screws that hold it in place and unplugging the power plug and on/off switch. Note: Take a photo of the wires before unplugging to ensure that it’s plugged back in the same order.
  3. Screw in the USB 2.0 adapter plug (provided in the upgrade kit) to the new baffle then replace the old baffle with the new one provided by screwing it back into position. Plug the power plug and on/off switch wires back in.
  1. Connect the new USB 2.0 adapter plug to the Touch Panel Controller board (A) and using the new connection wire provided connect the USB 2.0 Adapter to the main board (B).
  2. Now we need to replace the fans on the casing of our display. Find and remove the existing fans and replace them in the same orientation with the new fans provided in the upgrade kit. Take a photo before removing the fans to document the orientation.
  1. At this point the components have all been updated and we can zip tie the TPC board to USB 2.0 wire down using the same zip tie points that you cut earlier (zipties provided).
  2. Use the silicone glue provided to secure the following connection points:

    A. TCP board wire connection (1)

    B. USB 2.0 wire connection (2)

    C. Main board USB 2.0 connection (1)

    D. Power and on/off connections (7)

  1. We are ready to put our casing back on. To do so we need to plug back in our WIFI adapter, Fans and Speakers. Note that the position of the Fan and Speakers plug will be different than where they were plugged in initially. See new plug positions on the diagram.
  2. The 3 point WiFi connection is the most delicate connection so please be deliberate and careful when reconnecting.
  3. Plug the Fans and Speaker plugs back into the main board in the new positions on the diagram.
  1. Silicone glue the WIFI, Fans and Speakers connection.
  2. Screw the cover back onto the display.
  3. Reinstall the support beams to the display.
  4. Reinstall the base plate cover to The Arena.
Once the hardware upgrade is complete, follow the software update instructions via USB to upgrade the operating system to access all of the new features on the remote control and touchscreen display.
If you have any issues please reach out to support@gametheorytables.com

SOFTWARE UPGRADE INSTRUCTIONS

Once the hardware upgrade is complete, proceed with the software update to enable all new features available on the Arena’s remote control and touchscreen display. The software upgrade consists of two parts:
1. Updating the Remote Control MCU
2. Updating the System Firmware via USB
Software Upgrade — Two-Step Process
Step 1: Remote Control MCU Upgrade
(This file updates the remote control processor.)
INSTRUCTIONS:
  1. Copy the file PACK_MCU_AIoT3588.bin onto a USB drive.
    • File must be in the root directory (not inside a folder).
  2. Plug the USB drive into the Arena’s USB port.
  3. On the touchscreen interface go to:
    Settings → Apps → All Apps → System Assistant → OPEN → Software Upgrade → MCU ONLINE UPGRADE
  4. The system will automatically detect the MCU upgrade file on the USB drive.
  5. Allow the upgrade to complete. The Arena will automatically restart once finished.
  6. After restart, test the infrared remote control to ensure proper functionality.
Step 2: System Firmware Upgrade (USB)
File Needed: update.zip
(This package updates the main operating system.)
INSTRUCTIONS:
  1. Prepare the USB Drive
    • Ensure the USB drive is FAT32 formatted.
    • Drive must be 4GB or larger.
  2. Load the Firmware File
    • Copy update.zip to the root directory of the USB File
    • Do not unzip the file.
  3. Prepare the system
    • Return the display to the main Android interface.
    • Exit and clear all running applications before beginning the update.
  4. Start the Upgrade
    • Insert the USB drive into the mainboard USB port.
    • A system prompt will appear automatically.
    • Select “Install” to begin the upgrade.
  5. During Installation
    • The display will restart and enter a black-screen upgrade mode.
    • The upgrade typically takes 5–6 minutes, depending on USB drive speed.
  6. Factory Reset After Upgrade
    • Once the system loads again, remove the USB drive.
    • Go to Settings → System → Factory Reset.
    • Confirm and allow the Arena to reboot.
  7. The system firmware upgrade is now complete.
If you encounter any issues during the process, please contact
support@gametheorytables.com